
Version 2.0 of ArTime has been made for the celebration of NTNU’s anniversary in September 2010. It continues the ideas from the first version; that ArTime should be a continuously changing artwork with new versions for new events. For this event, both ArTime and a project called Objekt – prosjekt will be exhibited. The two works focus on women’s role through the history of NTNU, and also present the aspects of ArTe – enhancing the state of knowledge at the interdisciplinary intersection of Information Technology and the arts. The focus is on creativity, cooperation, and openness of processes and content.
ArTime v2.0’s content is still sonic and visual, and the use of Processing is central. Most of the problems from the first version has been eliminated, and the hardware has been integrated into the clock by making an additional wooden box.


Goals
The main goal was to create a suitable version for NTNU’s anniversary, with content reflecting the chosen topic. Also, it was necessary to work towards more aesthetic solutions for cables, integrating the computer etc, and improve the use of open source tools.
For evaluation, we wanted it to be possible for ArTime to log interaction. In this way, data could be collected and used for later research.
Functions:
– Two separate sound sources: Integrated speakers and headphones.
– Play random sounds from speakers when the clock strikes.
– Play a continuous changing soundtrack in the headphones.
– Trigger random sounds by pushing a button.
– Some of the sounds in the headphones should be able to manipulate by interacting with a sensor.
– Manipulated images showed in the photo frame.
– Logging of movement in front of sensor.
Sound
The Lenovo computer is now running Linux Ubuntu 10.04 with the ALSA Audio API module. Before I continue, here is a short lesson in computer audio (Feel free to skip it): An audio interface is a device that allows a computer to send and receive audio data from/to the outside world. Inside of the computer, audio data is represented a stream of bits, just like any other kind of data. However, the audio interface may send and receive audio as either a time-varying voltage signal, aka an analog signal or as a stream of bits aka a digital signal. In either case, the set of bits that the computer uses to represent a particular sound will need to be transformed before it is delivered to the outside world, and likewise, the external signal received by the interface will need to be transformed before it is useful to the computer. These two transformations are the raison d’être of the audio interface.
Within the audio interface is an area referred to as the “hardware buffer”. As an audio signal arrives from the outside world, the interface converts it into a stream of bits usable by the computer and stores it in the part hardware buffer used to send data to the computer. When it has collected enough data in the hardware buffer, the interface interrupts the computer to tell it that it has data ready for it. A similar process happens in reverse for data being sent from the computer to the outside world. The interface interrupts the computer to tell it that there is space in the hardware buffer, and the computer proceeds to store data there. The interface later converts these bits into whatever form is needed to deliver it to the outside world, and delivers it. It is very important to understand that the interface uses this buffer as a “circular buffer”. When it gets to the end of the buffer, it continues by wrapping around to the start.
The Advanced Linux Sound Architecture (ALSA) provides audio functionality to the Linux operating system. ALSA has the following significant features:
- Efficient support for all types of audio interfaces, from consumer sound cards to professional multichannel audio interfaces.
- Fully modularized sound drivers.
- SMP and thread-safe design.
- User space library (alsa-lib) to simplify application programming and provide higher level functionality.
- Support for the older Open Sound System (OSS) API, providing binary compatibility for most OSS programs.
After installing ALSA, I started the work of improving the audio part of ArTime. The idea was to keep the system where random samples could be triggered, but I wanted ArTime v2.0 to have two separate sound-sources – the integrated speakers and headphones. The speakers would reply with one sound when the clock stroke every hour, but not in the headphones. Vice versa, the headphones would have a soundtrack the observer could listen. I also wanted it to be possible for the listener to manipulate one part of the sound texture, i.e the pitch of a voice, but not the entire track.
Sound in Processing
The included library for audio in Processing is called Minim. It uses the JavaSound API, a bit of Tritonus, and Javazoom’s MP3SPI to provide an easy to use audio library for people developing in the Processing environment. The philosophy behind the API is to integrate audio into sketches as simple as possible while still providing a reasonable amount of flexibility for more advanced users. There is no callback and you do not ever need to directly manipulate sample arrays, all of the dirty work is handled for you. It works perfectly for simple stuff like triggering audio files, but unfortunately it doesn’t provide more advanced capabilities like changing sample rate in real-time. I therefore decided to change audio library to Sonia.
Sonia is an external Library for the Processing platform. It may also be included in any Java project. The Sonia Library provides multiple sample playback, realtime sound synthesis, realtime FFT (frequency) analysis of the microphone input, and writing .wav files from samples.
Sonia utilizes the JSyn plugin. This gave me a lot of trouble. After the install, I could import the library, but Processing kept saying that I didn’t have Jsyn installed. Both Sun Java 6 JRE and JDK were installed and I followed the description from the installation manual.
After too many hours of struggling, I received help from the wonderful Processing-forum. The key: When you download Jsyn for Linux there is a folder called “Lib”. Inside this I had a file called “libJSynV142.so”. Copy it and simply paste it in your SONIA folder: /libraries/sonia_v2_9/library
Suddenly, the sun emerged in the sky and birds came flying through my window, singing “You’re simply the best”. I celebrated with a cup of coffee. It finally worked!
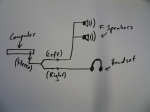
With Sonia and ALSA, the possibilities are endless. The system offers no latency and 16 channels support, but because our sound card only has stereo out, a rare audio split was made to achieve the goal of having two different sound sources in the integrated speakers and the headphones.
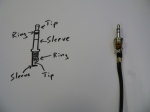
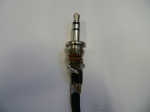
Split
The mini-jack is a TRS connector (tip, ring, sleeve). It is cylindrical in shape and typically has three contacts. In twisted pair wiring, the wire of each pair is known as the ring, while the inverting wire is known as the tip. A third, shielded, dedicated earth wire is known as the sleeve. To get separated audio in both sides of the headset, the tip-wire was soldered onto the ring-wire. The same process was done with the speakers; giving the silent side the same signal as the louder. In this way, the observer can listen to audio (mono, of course) in the headphones and the speakers can be used to play samples when every hour.


Hello Arduino
Goal: To control sample rate in Processing with a sensor.
solution:
1. Reading a sensor:
//code for Arduino board
int sensorPin = 0; //select input pin
int val = 0;
Serial.begin(9600); //open serial port
val = analogRead(sensorPin)/4; // read value from sensor
Serial.print(val, BYTE); // print variable to serial port
delay(100); // wait 100 milliseconds
2. Read data from the serial port:
import processing.serial.*;
Serial port;
float val;
void setup(){
size(440,220);
port = new Serial(this, arduinoPort, 9600); //data received from the serial port
if (port.available() > 0){ //if data is available
val = map(val, 0, 255, 0, 2); // convert the value
void setRate(){
// Values:
// 0 -> very low pitch (slow playback).
// 88200 -> very high pitch (fast playback).
float val = (height – val)*88200/(height);
mySample.setRate(val);
}

Logging
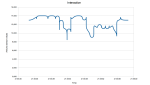
We wanted to log the movement in front of ArTime to evaluate the project after the event – to see how people chose to interact. To do this, a logging-script was included:
PrintWriter output;
void setup()
{
size(200, 200);
// Create a new file in the sketch directory
output = createWriter(“positions.txt”);
frameRate(12);
}
void draw() {
// Write the coordinate to a file with a
// “\t” (TAB character)
output.println(day() + hour() + minute() + second() + “\t” + val);
}
void keyPressed() { // Press a key to save the data
output.flush(); // Write the remaining data
output.close(); // Finish the file
exit(); // Stop the program
}
Then, we can represent the movement in front of the clock in a graph:


Manipulating images in processing
I made a sketch that finds a random pixel in a picture and tries to repaint the picture by making ellipses in the same color as the pixel. With this technique, the pictures becomes paintings, and depending on the time the sketch is running, it is possible to see the motive. With only a few ellipses, the observer has to use his imagination to understand the motive, but if the whole picture has been represented, the motive is fairly clear.


import processing.opengl.*;
PImage img;
void setup(){
img = loadImage(“NTNU-kvinner-22NY.jpg”);
//size(img.width,img.height,OPENGL);
size(img.width,img.height,P3D);
//size(800,800,OPENGL);
background(0);
}
void draw()
{
rectMode(CENTER);
ellipseMode(CENTER);
float x = random(0,img.width);
float y = random(0,img.height);
color col = img.get(int(x),int(y));
float siz = random(5,15);
float rd = red(col);
float grn = green(col);
float bl = blue(col);
fill(rd,grn,bl);
noStroke();
if(brightness(col)>120)
ellipse(x,y,siz,siz);
}
The poetic message
Whenever one is working with expressions like those mentioned in this post, it is important to think about what you want to achieve, not only by making the technology to work the way you want it to, but also to have a poetic message. What message are you trying to convey? A way of discussing the aesthetic message is to characterize the object as an empty form where the interpreter inserts meaning. With digital art and interactive artworks, this becomes more complex. There will always be guidance made from the artist that counteracts this openness. From an article by Joonsung Yoon and Jaehwa Kim on The Interactive Artwork as the Aesthetic Object, it is written that one can study models of information and communication theory, but like any other message, the artistic message can be decoded only on the basis of a common code shared by both the sender and the receiver. In literature, for example, this code consists of a standard language but also of the traditional literary conventions, which have become codified in normative poetics and rhetoric. Messages generated from only these common codes follow an aesthetics of identity. Because of the reason that the stimulating subject is technology, aesthetic technology should be discussed in focusing technology more in-depth in terms of art and technology converging each other. In that regard, working with open source software and displaying the results like this blog does, fits the challenges well.
In ArTime v2.0, both the sounds and the images are manipulated so that the interpreter has to ask himself what it is that he sees/listens. In this way, he approaches the content in another way that he would do if it was presented un-manipulated. The images used are from NTNU’s archive, and show women in different roles through the university’s 100 years old history. The sound material is collected from sites such as freesound.org, ccmixter.org and librivox.org, where users can download sounds, songs, audio books etc freely.
Questions and answers:
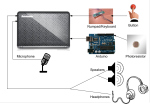
1. What are the hardware components and their software:
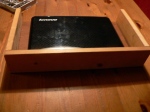
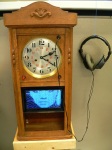
Computer: Lenovo IdeaPad S12 with Linux Ubuntu 10.04.
ArTime Processing applet is running.
Screen: Samsung SPF-107H 10” digital photo frame.
Speakers: Cheap PC speakers, unknown brand and specs.
Headphones: (New ones will come)
2. The architecture:

3. Documentation and the code:
Everything is published on this webpage.
The source code can be downloaded from a link in the bottom of the page.
4. In which language is the code written?
The code is written in Processing – an open source programming language and integrated development environment built for the electronic arts and visual design communities with the purpose of teaching the basics of computer programming in a visual context, and to serve as the foundation for electronic sketchbooks.
I’ve commented the code to make it easier understood.
5. Which libraries do you use?
For sound: Pitaru Sonia: http://sonia.pitaru.com/
For reading from Arduino: Serial: http://processing.org/reference/libraries/serial/index.html
The libraries are imported in the beginning of the code:
import pitaru.sonia_v2_9.*;
import processing.serial.*;
6. Are there any known bugs? Which are the known problems?
- If the Arduino is not plugged in, the program will not run because line 50, “myPort = new Serial(this, portName, 9600);“ will return no active ports.
- The window size is selected by line 44: “size(screen.width, screen.height, P2D);. The P2D is a fast 2D renderer, best used with pixel data. For some reason it seems like Processing crashes without this renderer in Linux.
- If it runs hot, the sound will stutter and the button and sensor will give bad response. Stop the program and let the machine rest for a while before starting it again.
- ArTime will shut down without power supply. Ideally, it should start up when power is on, but this has not been succeeded. Follow the instructions below to start the installation.
- Important! Before you shut down, open the computer and press ‘3’. This will flush the logging-script and close the program. If it is closed manually, the logging data will be lost.
7. How to start.
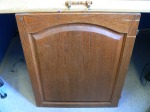
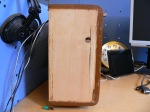
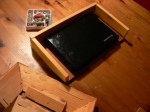
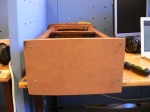
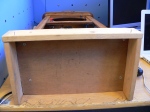
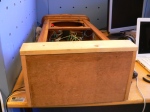
- Access the computer by pulling it (gently) out of the wooden box in the back.
- Make sure that every USB-cable is connected.
- Make sure that the microphone cable (white cable, red “head”) is connected.
- Make sure that the loudspeaker cable (black cable, black head) is connected.
- Open the lid and turn the computer on.
- A terminal launches when Ubuntu starts. Type ./Documents/Processing/processing-1.1 (I don’t remember if this is the correct path, but it should be close. You can also press the ‘up’-key to find the last command. Processing will start.
- Open the sketch ArTime_v2_0 and run it by clicking the play-button.
- (Instead of running it from Processing, you can also start it from the applet.)
- A grey window will show and a chinese voice should be heard in the headset along with ticking.
- Make sure that the button triggers sounds (in headset) and that you can influence the pitch by moving you hand in front of the photo-resistor.
- Close the computer lid and put it back in the wooden box.
- Hide the cables as much as possible.
- In the back of the photo frame, there is a on/off-button. Press this to start it.
- Navigate by using the round button and enter “Slide show”.
Examples
Here are some sound examples:
Source code:
Download the code here.


Leave a comment